Pumpkin Decorating Tips
- Let your pumpkin speak to you: Does it have bumps that suggest ears? Or a stem that suggests a beak? Does the pumpkin sit low like a car, or does its triangular shape and height remind you of the Eiffel Tower? Find the pumpkin’s quirks and feature them!
- Provide exciting art supplies: Our team found more inspiration in our baskets of art supplies. Some favorites: googly eyes, acrylic paint, pipe cleaners, craft sticks, twine, pom-poms, permanent felt-tipped markers, construction paper, felt, pencils (for sketching), sticky foam, skewers, sticky notes, and whatever else was on hand.
- Carving tools: We used simple carving kits that included mini saws and scoopers. You can also use wood-carving gouges, but as these are sharper, they should only be used with adult supervision.
- Sketch first: Use a pencil to sketch features before you cut.
- Keep your work area clean: Cover your work area with craft paper and provide bowls and pans for pumpkin guts. For our big pumpkin palooza, we provided high-sided aluminum catering pans.
- A word about safety: For young children, no-carve pumpkins are a great solution. For kids who choose to carve, grownup assistants are helpful. Make sure your pumpkin sits securely on your work surface before you start your masterpiece and while carving, carve away from yourself. If you’re etching the skin of the pumpkin, be sure to go extra slowly since the curved surface can be slippery.
Prize-winning Pumpkins
Halloween Steve by Carlianne, Illustration
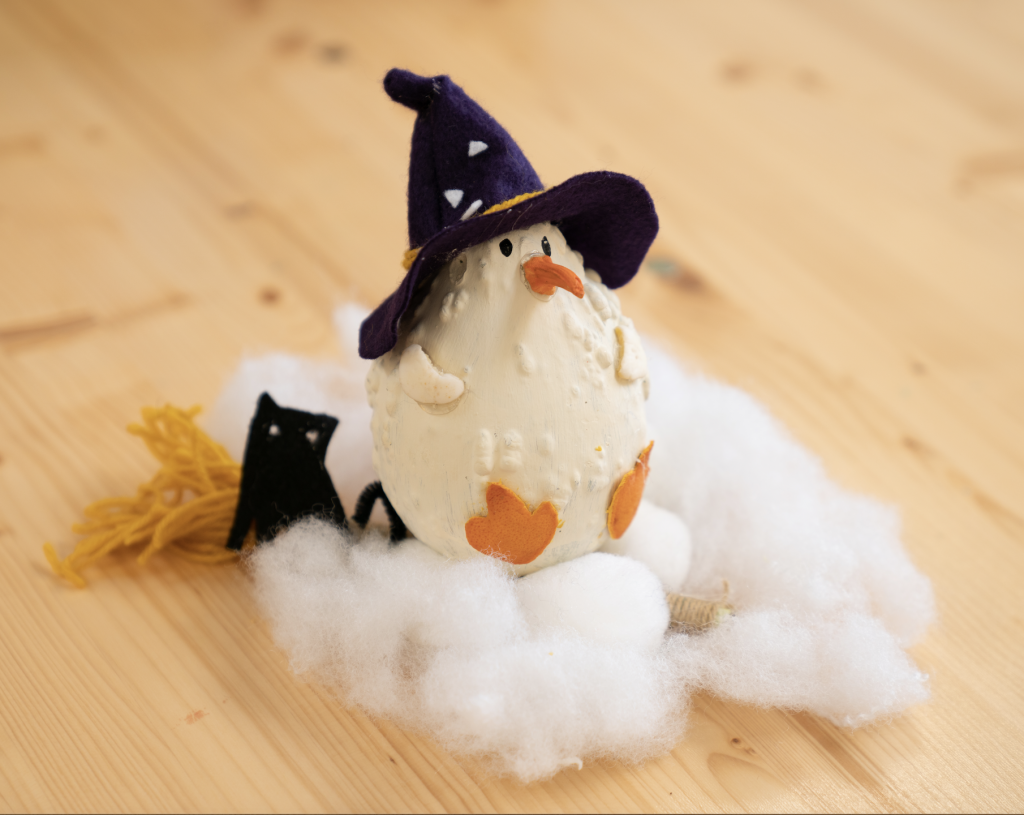
Inspiration: I draw the Kiwi Co characters here, so when I saw the shape of this gourd, I immediately thought it looked just like Steve! I wanted to shave off the little warts, but it turned out to be really hard to get off, so instead I decided to lean into the imperfections and leave the bumps as “warts” and make Steve dress up for Halloween.
Method: I found felt to make the hat, and a cat companion. I used a straw wrapped in yarn for a broom and some extra “fluff” for clouds (which also helped him stay standing up). Then I used pieces from a second pumpkin to make his nose, and wings, with tangerine peels cut to look like feet. I applied just a little paint to his body and beak as finishing touches. It was really fun to see the Steve I draw everyday come alive in my hands!
Autum Owl by Iris, Editorial
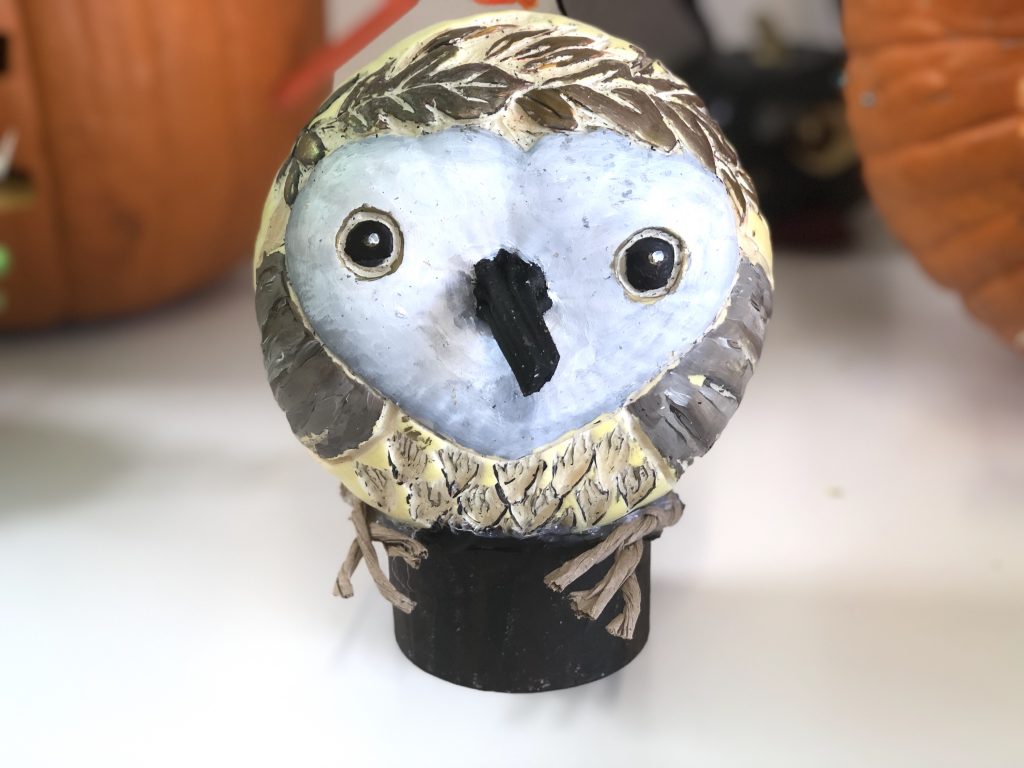
Inspiration: After looking at some examples, I realized that if you hold a pumpkin sideways, the stem looks like a bird’s beak. I found a smooth, white one with an especially beak-like stem. The color made me think of Hedwig from Harry Potter, so I decided that my pumpkin would become an owl (though I ended up making my owl’s wings brown, so he’s not really a snowy owl like Hedwig is).
Technique: I decided on a combination of painting and etching with wood-carving gouges.). I first lightly sketched the outline of my owl onto the pumpkin with a soft artist’s pencil. Next, I painted the features and the leaf crown with acrylics and followed up by etching in the outlines of the face, feathers, eyes, and leaves. I used metallic paint pens to add some additional details, then made feet from paper-covered floral stems (you could easily make your own by wrapping paper around pipe cleaners or wire) and painted a cardboard cylinder from a roll of packing tape to make a stand so the sideways pumpkin wouldn’t roll away. I used hot glue to secure everything, painted over any glue drips, and erased any remaining pencil lines. Lastly, the placement of the eyes is important. I wanted a cute, curious owl, so I put my eyes directly on either side of the beak. (If you wanted a more piercing stare, you could put them above the beak.) It took me a few tries to get it right, so I was really glad I sketched the eyes in pencil before painting anything!
Spooky Spider by Andy, Product Design
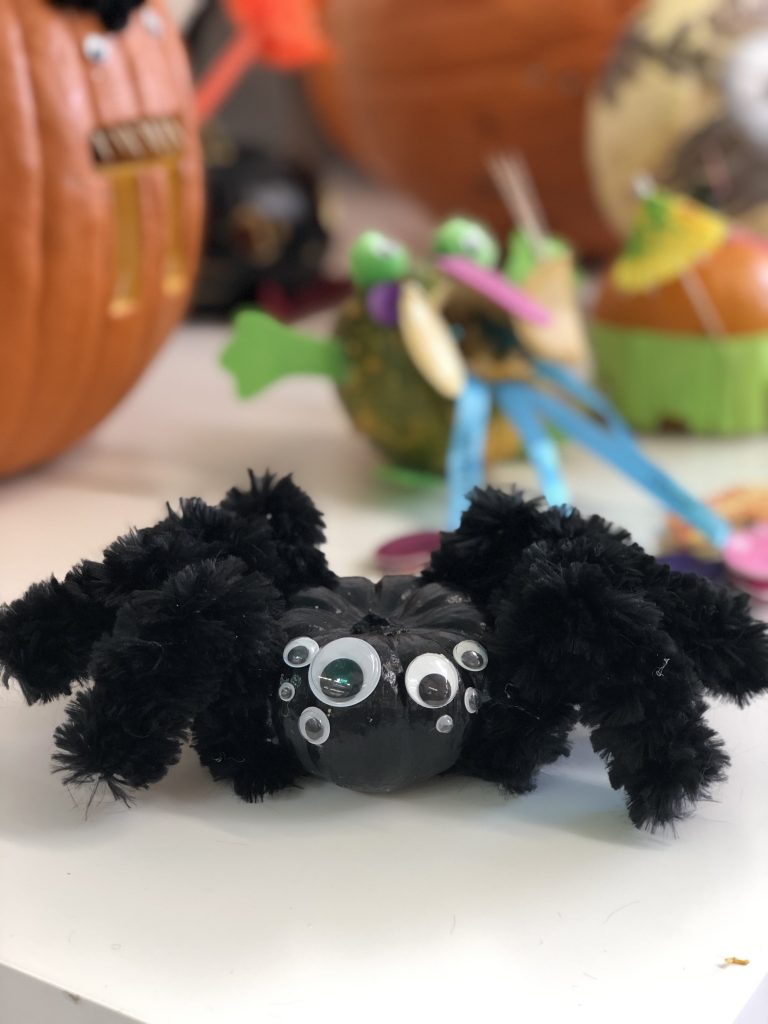
Inspiration: I was inspired in a number of ways. We did a motion-sensing spider crate a couple of years back, and I wanted to recreate it. Also, the googly eyes and giant pipe cleaners are amazing and fun to work with. (Spiders have eight eyes!). Spiders also fit nicely with Halloween.
Method: Since I knew we were in the middle of an event, I wanted to make something quick and easy. The small pumpkin I chose was very cute and was the perfect size. I painted it black and then added different-sized googly eyes to make it both cute and creepy!
Panda Pumpkin by Suki, Product Design and Maria, Graphic Design
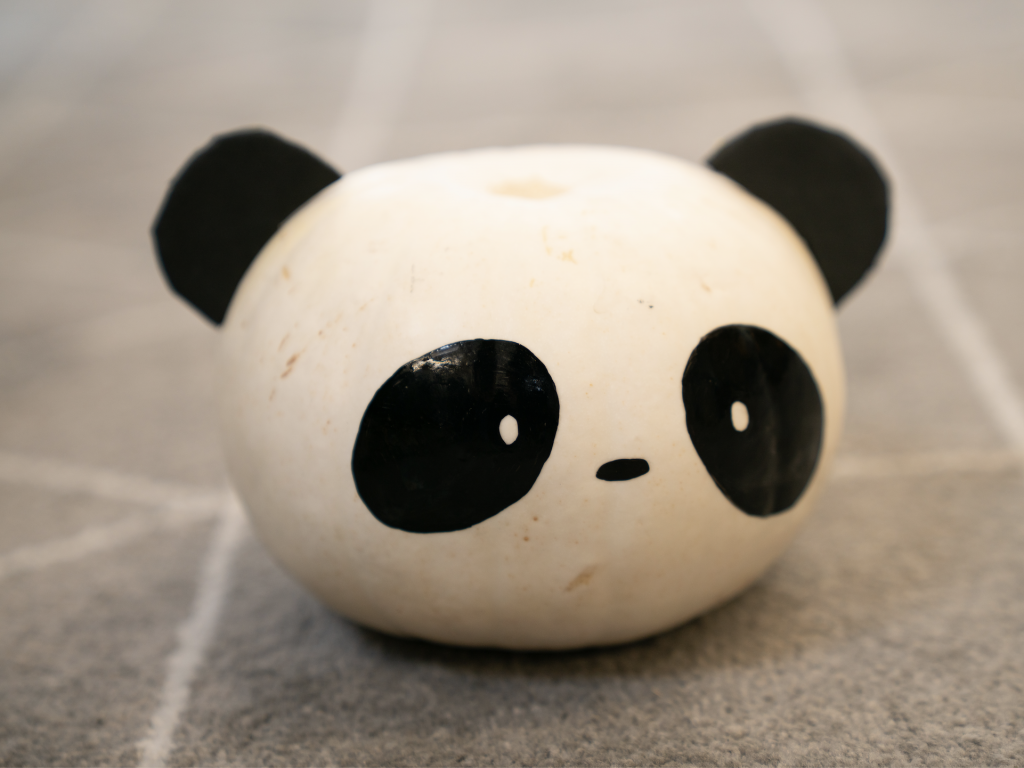
Inspiration: Suki and Maria, who both work on our Panda Crate line, were inspired by its mascot, Poppy the panda.
Method: We scaled and printed out the panda face onto paper. Then Suki cut out the eyes to use as a stencil. We cut ears out of sticky foam and stuck them in with toothpicks
Little Hula Pumpkin by Christine, Marketing
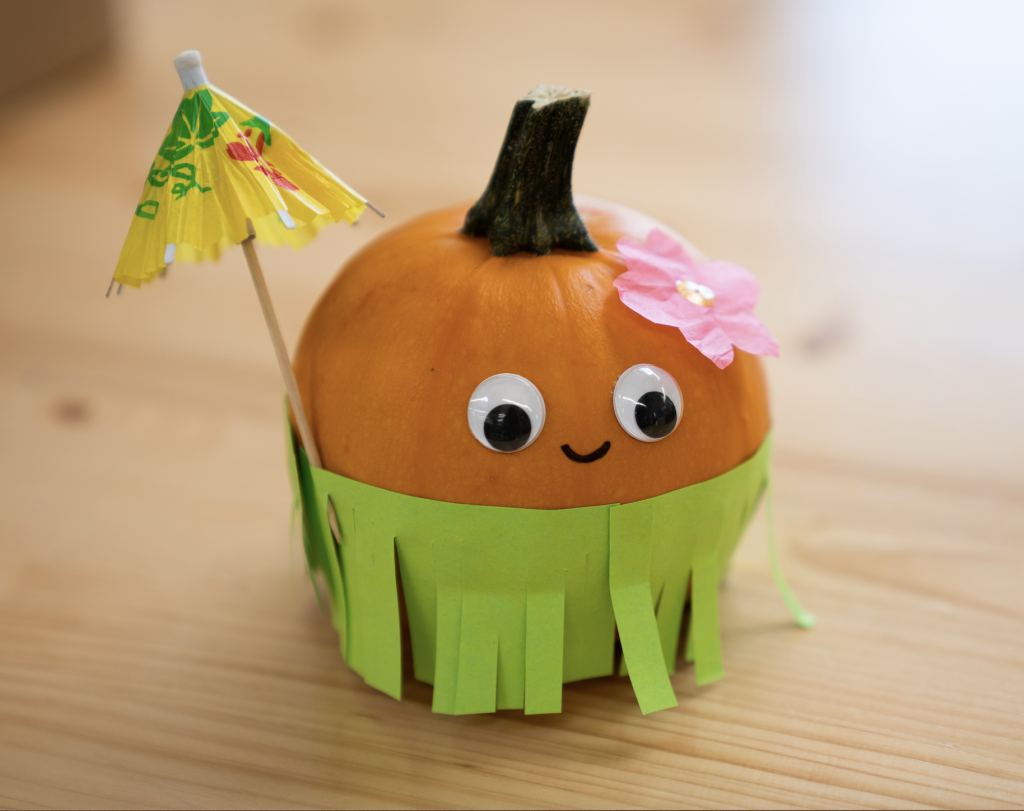
Inspiration: With how cold it’s been getting, I wanted to hold on to summer just a little longer and thought a little tropical hula pumpkin would be cute. (You only ever see pumpkins associated with fall and winter!) I wanted to bring a bit of summer vacation vibes into the office.
Method: I cut slits in bright green sticky notes to create the hula skirt and used bright pink tissue paper for a little flower. I added a little cocktail umbrella for style. If I had more time, I would have made sunglasses out of a pipe cleaner!
Cinderella’s Carriage by Lindsey, Editorial
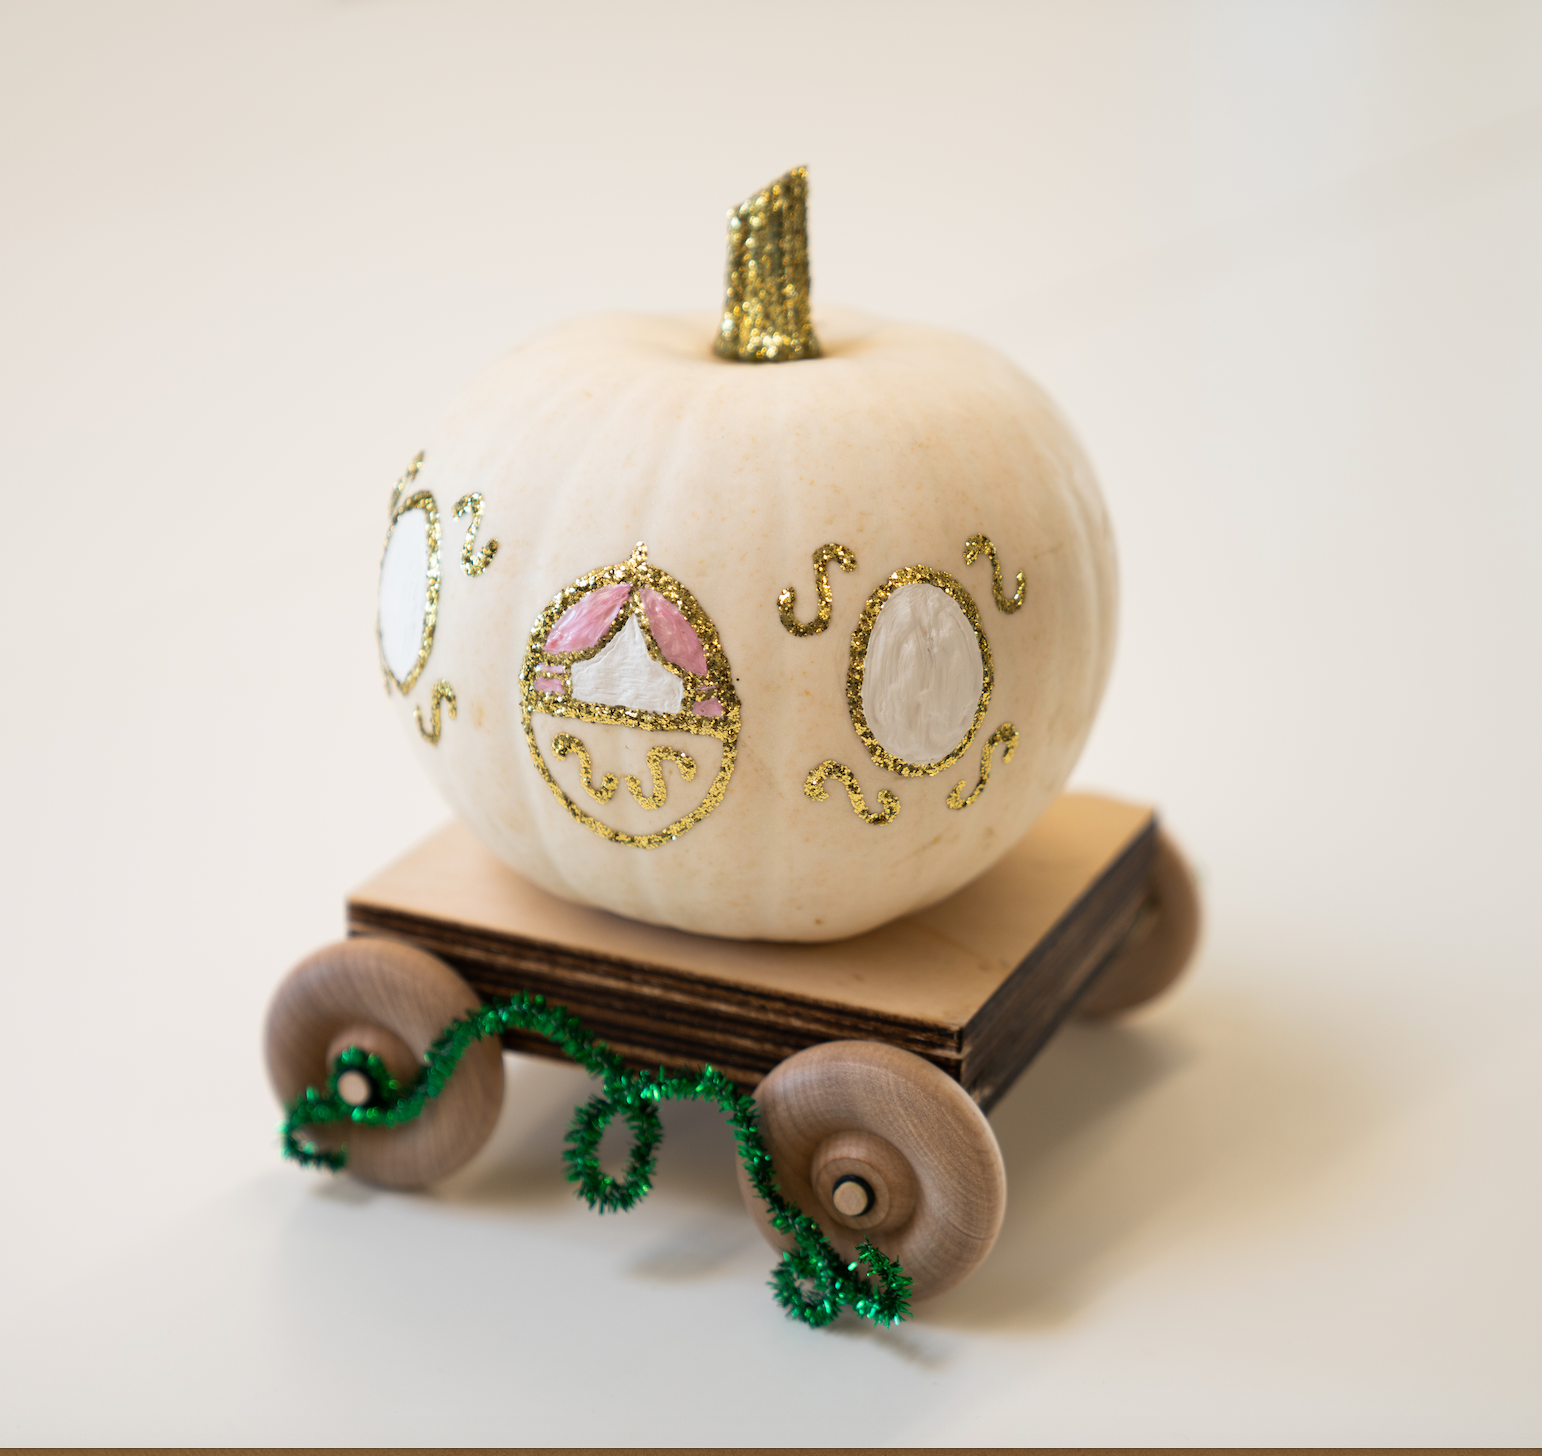
Inspiration: Growing up, Halloween was such a special, festive holiday for our family, and it was something I truly looked forward to every year. We established a tradition where I would choose the perfect white pumpkin at a local pumpkin patch, and my dad would then use puff paint to turn it into Cinderella’s carriage. I have such fond memories of this experience, and I wanted to recreate it – or at least attempt to!
Method: I sketched the windows and carriage door directly onto the pumpkin with a pencil. Then I selected a few puff paints (iridescent white, baby pink, gold glitter), and free-handed the rest. I used my pencil outlines as a rough guide but adjusted as I went along. The final step was painting the stem gold to make the carriage truly sparkle.
Gnome Sweet Gnome Pumpkin by Nathalie, People Operations
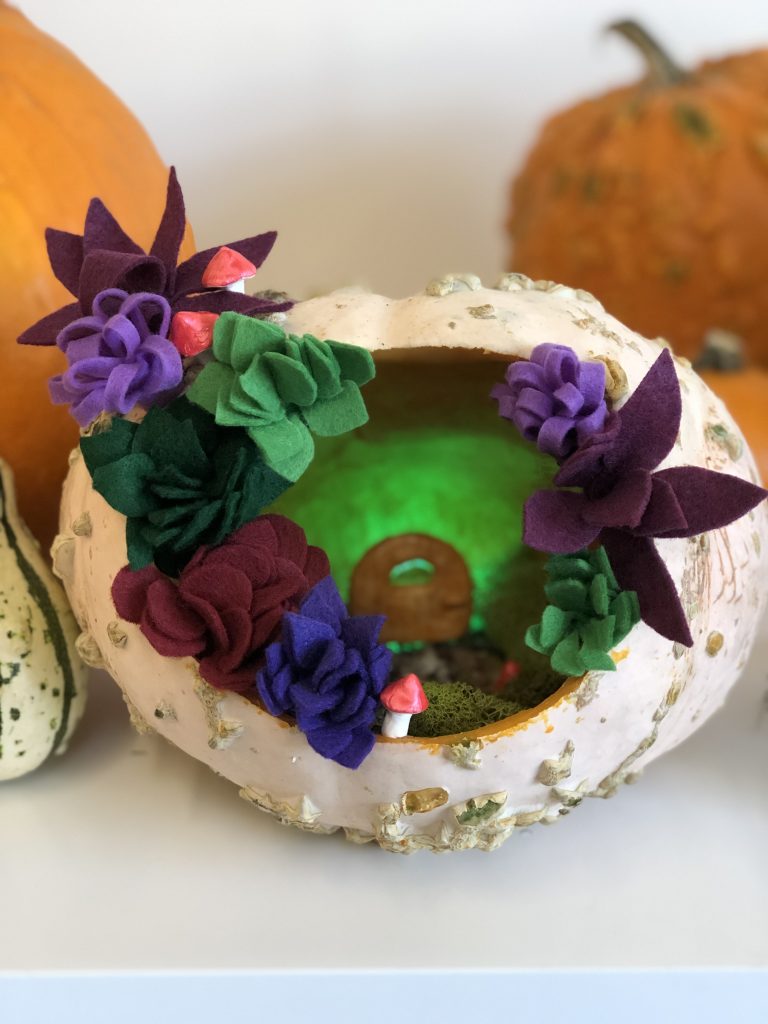
Inspiration: I liked the idea of creating a little world inside the pumpkin. With it’s flat shape, light color, and bumpy texture, this pumpkin looked like something you might find in a forest–It inspired me to create this dwelling for a gnome.
Method: I am a plant lover so I planned on using real succulents from my garden, but decided instead to make flowers out of felt. I hollowed out the front of the pumpkin and used quick dry clay to create doors, windows and little mushrooms. Then I paved a path in the interior using rocks and moss and added a light to make it feel welcoming.
Hungry Anglerfish by Rebekah, Product Design
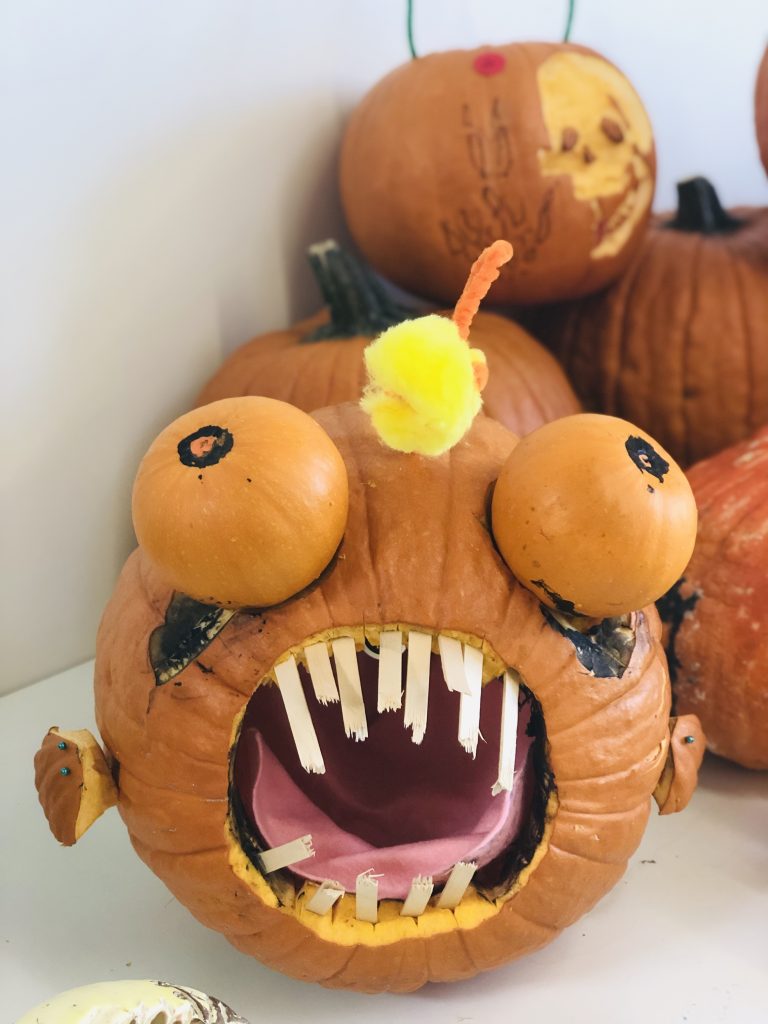
Inspiration: I had no idea what I was doing when I started. Instead, I went on an If You Give a Mouse a Cookie–style journey until arriving at something that looked like an anglerfish.
Method: At first I noticed a bag of googly eyes and thought I wanted to cover something with them, but then I saw two smaller pumpkins and thought I could make them into two eyes like a fly! I attached them to a bigger pumpkin after carving out eye sockets. But then the pumpkin didn’t look like a fly. (Flies don’t have compound eyes!) I tried to carve vampire teeth, but they looked bad, so I tried pumpkin seeds, but those were too hard. Then my colleague Yuli left a few spare parts from her pumpkin on my table, and they looked like fins, so I made a fish. Then someone said it looked like an angler fish, so I added a dangler and craft stick teeth!
SETI by Sam, Finance
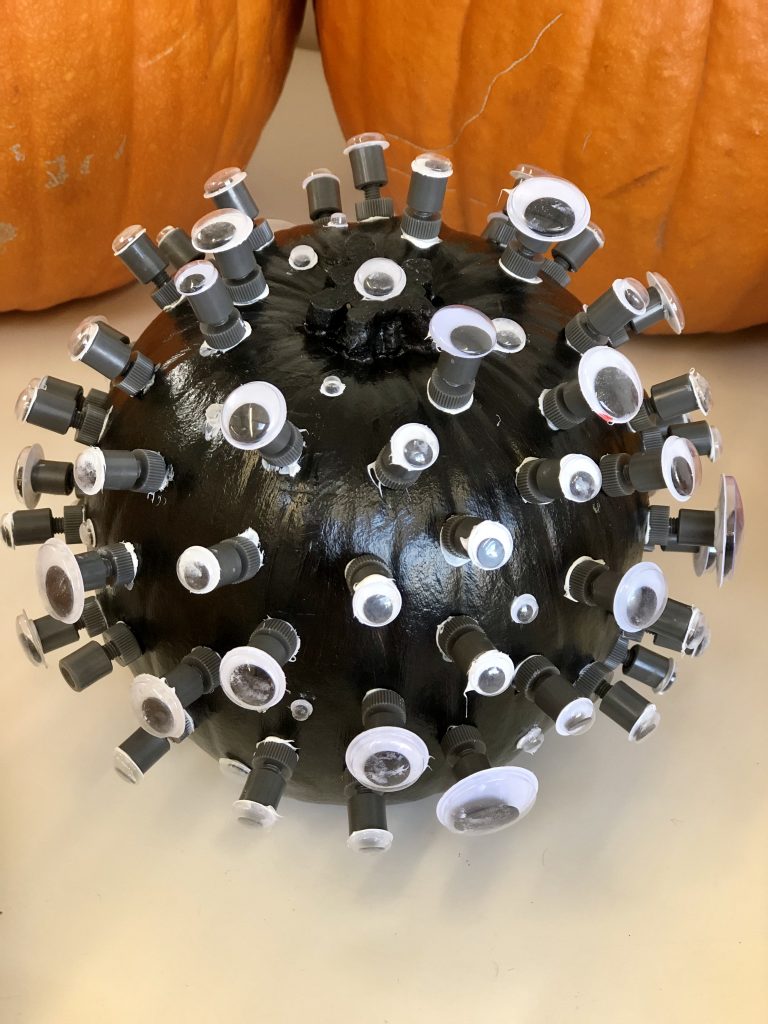
Inspiration: A large stash of googly eyes and a package of tiny toy parts inspired this SETI pumpkin (SETI stands for Search for Extraterrestrial Intelligence).
Method: First I painted the pumpkin black and let it dry. Then I glued the toy parts all over the pumpkin , let them dry and glued on the eyes. This pumpkin was fast and fun to put together!
Show us your pumpkin creations! Tag us at #kiwicopumpkins!


